| Back to Back Issues Page |
 |
|
Paper Twists, Issue #001 -- Some Twinchies for the New Year! January 10, 2009 |
| Hi It's a brand New Year. Have you started paper crafting yet, or are you still recovering from your holiday crafting? If you need a little inspiration, can I tempt you back to your craft table with a sneak peak at my Twinchie project? You're the first to know about these! This project won't be available on PaperCraftCentral until you have had a chance to see it!
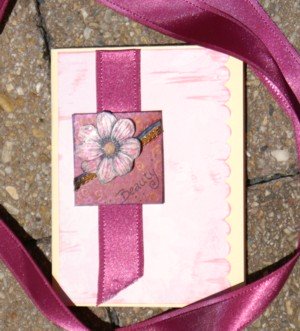
January 2009 - Issue #1 - What are Twinchies?Here's a New PaperCraftCentral Idea!A Twinchie is a small work of art. Making them is quite appealing amongst papercrafters! They are slightly bigger than an Inchie. They are 2" square pieces of chipboard (or 5cm x 5cm in metric) that have been decorated as individual works of art. It can be a lot of fun to make a bunch of these, and (warning!) this can even become addictive! Just as described in the method for the Inchies, you can make these little beauties in the same way. I made one just to place on a special card I was making today. I started with a square of chipboard. Here's what I did next:
I added some pink flowered designer paper that I had scalloped and inked in pink to my yellow cardstock base front, adhered a nice thick cranberry coloured ribbon (left over from a Christmas project!) to the left and then my little Twinchie could be popped up on top of the ribbon and designer paper.
Product Review - Radiant Rain Paint DaubersRead about Radiant Rain Paint Daubers on PaperCraftCentral.comMoney Saving Tip!Are you spending lots on templates? If you haven't been out in your back yard lately, take a look there with new eyes. Nature is a wonderful inspiration for paper crafters. You can find beautiful leaves to paint and use as templates, (try a dried one that is mostly skeleton for a beautiful effect), or use grasses and barks as paint brushes. Dried flowers look even more beautiful on projects than paper ones sometimes. Just seal them with a little spray adhesive or hair spray to ensure they last better, or place them behind a blister or inside a page protector to ensure they don't crumble. The added advantage of taking inspiration from nature is that you will always have a unique design, too!
Special!For this issue of Paper Twists I have found you an online store with a special on Core'dinations Cardstock. Scrap Book 'n' Bits is a store where I always get good service, and I wanted to let you know about the massive paper sale they are having there at the moment! Some of it is only $AU.40¢ and $AU.30¢ per sheet! Core'dinations Cardstock is a wonderful paper that has a different coloured core. You can sand, distress or tear this paper to reveal a different colour inside. It's also a stronger or heaver weight paper. I made a paper wallet album out of Core'dinations Cardstock and it did last better than ordinary cardstock.
And that's it for the first issue of Paper Twists. What did you think? If you enjoyed it, please feel free to pass on a copy to your friends or to encourage them to subscribe. The more the merrier! And I'd love to hear any feedback you have for me about what you would like to see in future issues. Just hit 'reply' and send me an email. Look forward to more specials and surprises in future issues of Paper Twists! Happy Paper Crafting! Susan
|
| Back to Back Issues Page |