- Home
- Papercraft Adhesives
- Night Owl Card Challenge
May 2012 Creative Challenge - Night Time Owls
Written and Created by PaperCraftCentral Susan
This is what we did for the May 2012 Creative Challenge. I ran a series of challenges for readers to try out in 20212, and they were so much fun I decided to leave them up for future reference!
Even though this challenge is over, I left the instructions and example card up as inspiration for you. If you do make something this challenge, please do show me what you make.I'd love to think that the owls I love are an evergreen theme!
I love papercraft owls and seeing how people used the Owl Builder punch (now sadly retired). You can use any owl shape now to make your project. Just be sure to include owls somewhere on your card. Maybe you even have designer series paper you could choose to use for this challenge.
You could even make a punch art owl with your punches and Cut and Emboss Machine. Or maybe you have a stamp set with owls in it? A stamped owl or two or three would definitely fit this challenge.
Night Time Owl Challenge Rules:
This time, I challenge you to create a handmade greeting card or scrapbook layout with:
- some kind of night time owl as a feature.
- You must also use navy, shades of pink, yellow and/or orange in your creation.
- You may use my sample as a sketch or make up a sketch of your own.
Here is my card:

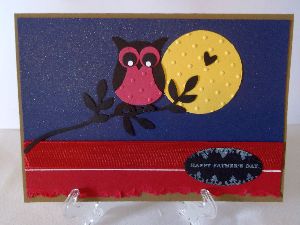
My Inspirational Sample for the May 2012 Creative Challenge - Nocturnal Owls:
All supplies I used are from Stampin' Up! either current or retired.
I made my background with Night of Navy cardstock spritzed with Frost White Shimmer Paint (NLA) that had been diluted with rubbing alcohol and placed in a little spray bottle.You could make your night sky background with designer series paper if you have some of the night sky. That may even look better, but mine had a shimmer to it that I liked a lot after I spritzed it with the shummer paint and alcohol.
I then used Cherry Cobbler below the navy cardstock and I tore and sponged the layer with Cherry Cobbler ink before adding a piece of Cherry Cobbler seam binding and drawing a line under it with a white gel pen.
Stampin' Up! used to have white gel pens in their range. Now I get mine from Officeworks in Australia. Try a stationery store for a white gel pen if you have no Officeworks near you.
My owl is made out of Regal Rose (retired), Basic Black and Basic White cardstock. Of course I used the Owl Builder paper punch (NLA) from Stampin' Up! to make the little guy.
It's a pity that particular owl punch is no longer available, but do try your hand at making a punch art owl without it perhaps. You could still use your punches. Try circles for the head and body and half circles for the wings. You can add facial expressions freehand with your markers or you could use face stamps if they fit.
Next I ran the owl's Regal Rose waistcoat and a So Saffron (retired colour) punched circle paper moon through my Die Cut and Embossing Machine using the Perfect Polka Dots embossing folder (NLA).Just choose the sahdes of pink and yellow that you like, or that yu have in your stash.
I punched out three black branches with the bird punch (NLA) and glued them together with Tombow Multipurpose Liquid Glue into a long branch for my owl to sit on.You could hand cut one of your own, or if you have a die shaped like a branch, cut one of those out. Or if you don't want a three dimensional branch, stamp one onto your cardstock.
Then I stamped my sentiment and its flower frame in White Stazon ink on Basic Black cardstock (using the Tiny Tags, NLA, and Teeny Tiny Sentiments, NLA, stamp sets) and punched it out with one of my oval punches. Again, choose a die cut shape instead if you like.
TIP: When using punches, remember to stamp first and punch later. You can line your words up perfectly with your punch that way by holding the punch upside down and positioning your image directly in its open window before punching the shape out.
I popped up my owl and sentiment on Stampin' Dimensionals (foam tape) and added a little punched black heart to the moon.
Isn't he sweet!
I have to thank Adele Suda, a fellow Stampin' Up! Demonstrator here in Australia, for the card layout and ideas. I so enjoyed making this card, Adele, and am glad you shared it.
I think this card idea could easily be used on a scrapbook page, don't you?
OK, it's over to you now. Let me see your night owl project. I hope you have some fun with the May 2012 Creative Challenge
Submit Your Challenge Entry Here
Please do show me your entry for the Challenges, with a picture or two or three, and a few words about how you made your creations.
What Other Visitors Have Said
Click below to see contributions from other visitors to this page...
Just Wanna Say Hi Card Not rated yet
I’ve used Pink cardstock for the card; I’ve used my jumbo wheel stamp on Navy cardstock to make the background, a Yellow moon. I used my Cricut to make …


New! Comments
Have your say about what you just read! Leave me a comment in the box below.