- Home
- Papercraft Adhesives
- Paper Tearing Technique
Tearing Paper
Written and Created by PaperCraftCentral Susan
Tearing paper is something that some of us paper crafters tend to avoid doing. Some of us want to make our projects as perfect as possible and despair over a misplaced scored line, an uneven meeting of edges, paper cut too short or too thin.But if you are brave, tearing paper can add a lot of character to your paper projects and hugs!
It can be so refreshing and stress relieving to think about actually ripping your project instead of keeping it perfect! Lol!

Why would you have Tearing Paper in Papercrafting?
I'm not suggesting a general destruction of things here. I'm talking about a controlled ripping of some layers of your project. What you are aiming for is an interesting, uneven edge for some of your layers, or a border of tearing, or an embellishment or two ruffled up to look more interesting.
Torn paper is also very useful for when you are masking a background and want to have faux mountains and skylines. Tear a Post-It note to create such a mask, making sure you tear the part with the adhesive on the back so you can lay it down on your project and it will stay put while you create your edges with a blending brush or other papercraft tool.
A torn paper layer can also add the suggestion of age to a layer or an embellishment. You can distress paper further by staining it a tea or coffee colour or by adding water to a piece and allowing it to dry.
Tearing a page out of a spiral bound notebook may add just the effect you want for a journaling piece. Leaving the spirals rough may look like you just added a page of your own journal to a scrapbook page, for example.
You can use strips of paper with torn edges to make a woven background piece. Or you can use shapes of torn paper to make a patch work quilt effect, and even stamp over the top of these pieces to add depth.
Torn paper pieces can look great if you are piecing together a furry animal like a bear, a dog or some other fluffy creature. Even fish scales can look better with torn edges, on the right project!
Instead of sharp edges on triangular trees, try torn edges for a more natural effect, or make torn paper edged clouds for your landscapes, torn petals to make flowers, torn edges to create grassy layers...your imagination can lead you all sorts of places with paper tearing techniques.
Here's how I use this technique:
I always gather what supplies I think I will use first. In this case, I would find something like what is on this list:
- First, choose the paper you want to use as a layer.
- If you choose double sided paper (Designer Series Paper or DSP for short), make sure the side you want to show on your project is facing you.
- You can also use Co'ordinations cardstock, as it has a coloured centre layer and this makes an interesting two-toned rip
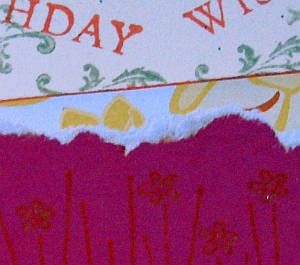
- Now grip the edge of one side of the paper, and carefully tear the edge toward you. This way you will have an exposed white (or coloured if using Co'ordinations or most Stampin' Up! Basic White cardstock as it is coloured all the way through) edge as the middle layer of the paper is left exposed
- Continue to tear each of the edges of your paper until you have the effect you want
More torn paper tips:
- Some people use a water dipped paint brush or a Water Painter or Blender Pen to draw along the edge they want to tear before ripping it. This can help to make the edges a little straighter or controlled.
- Sometimes I use a tearing ruler to rip along the edges of longer pieces of paper, such as a 12" x 12" scrapbook page. These rulers already have an interesting and uneven edge and using them as a guide for your ripping action can create a wonderfully designed effect, without the crafter accidentally tearing a paper too much or in the wrong direction.
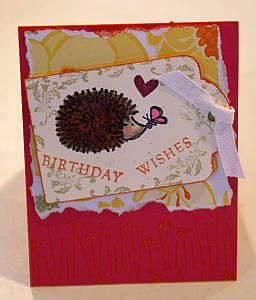
- I left the torn edges of my layers white in the handmade greeting card shown above but you can ink them in a similar or different colour. This is known as a distressing technique
-
Something else you can do once the white layer is exposed is to sponge
or ink it in a colour that contrasts or compliments your project.
- Or curl the thin edges with a wooden skewer or paper piercing tool shaft. You can make your paper look quite old and worn by continuing to work the edges this way
- Try using torn-edged layers to make your 3-d paper flowers sometimes, too.
- You can add many layers of torn paper to a project for a textured and free-form effect
- Sometimes I tear all the way around a stamped image instead of cutting it out neatly
- I made a torn paper mat for my crayon resist card project
- Torn paper is great to use as a mask when you want a ragged inked edge on a project, such as in this reflections card.
Are you ready to try it? Go release some stress and start tearing paper, or ripping some paper purposefully today! Lol!

If you liked this technique, you might like to try stamping with bleach or CASEing a card next.


New! Comments
Have your say about what you just read! Leave me a comment in the box below.