- Home
- Papercraft Adhesives
- Scrapbook Ideas 1
Scrapbook Ideas 1
Written and Created by PaperCraftCentral Susan
A Special Occasion Page
In Scrapbook Ideas 1, I will show you how I made a page for my album with some Disney scrapbook paper to follow a challenge.
"Keep your face to the sunshine and you will never see the shadow."
~ Helen Keller
In Scrapbook Ideas 1 I am going to tell you about a page I made in response to a fun challenge I was thrown. I will add more ideas about scrapbooking for you as people have asked me for some ideas for their own pages. To help beginner scrappers especially, here are the instructions for the page that I made:
Scrapbook Ideas 1 - The Challenge
The challenge went like this:
Make a page about some loved ones on a special occasion, using
- A monogram made from patterned paper
- An inchie
- A painted title
- At least one puzzle piece
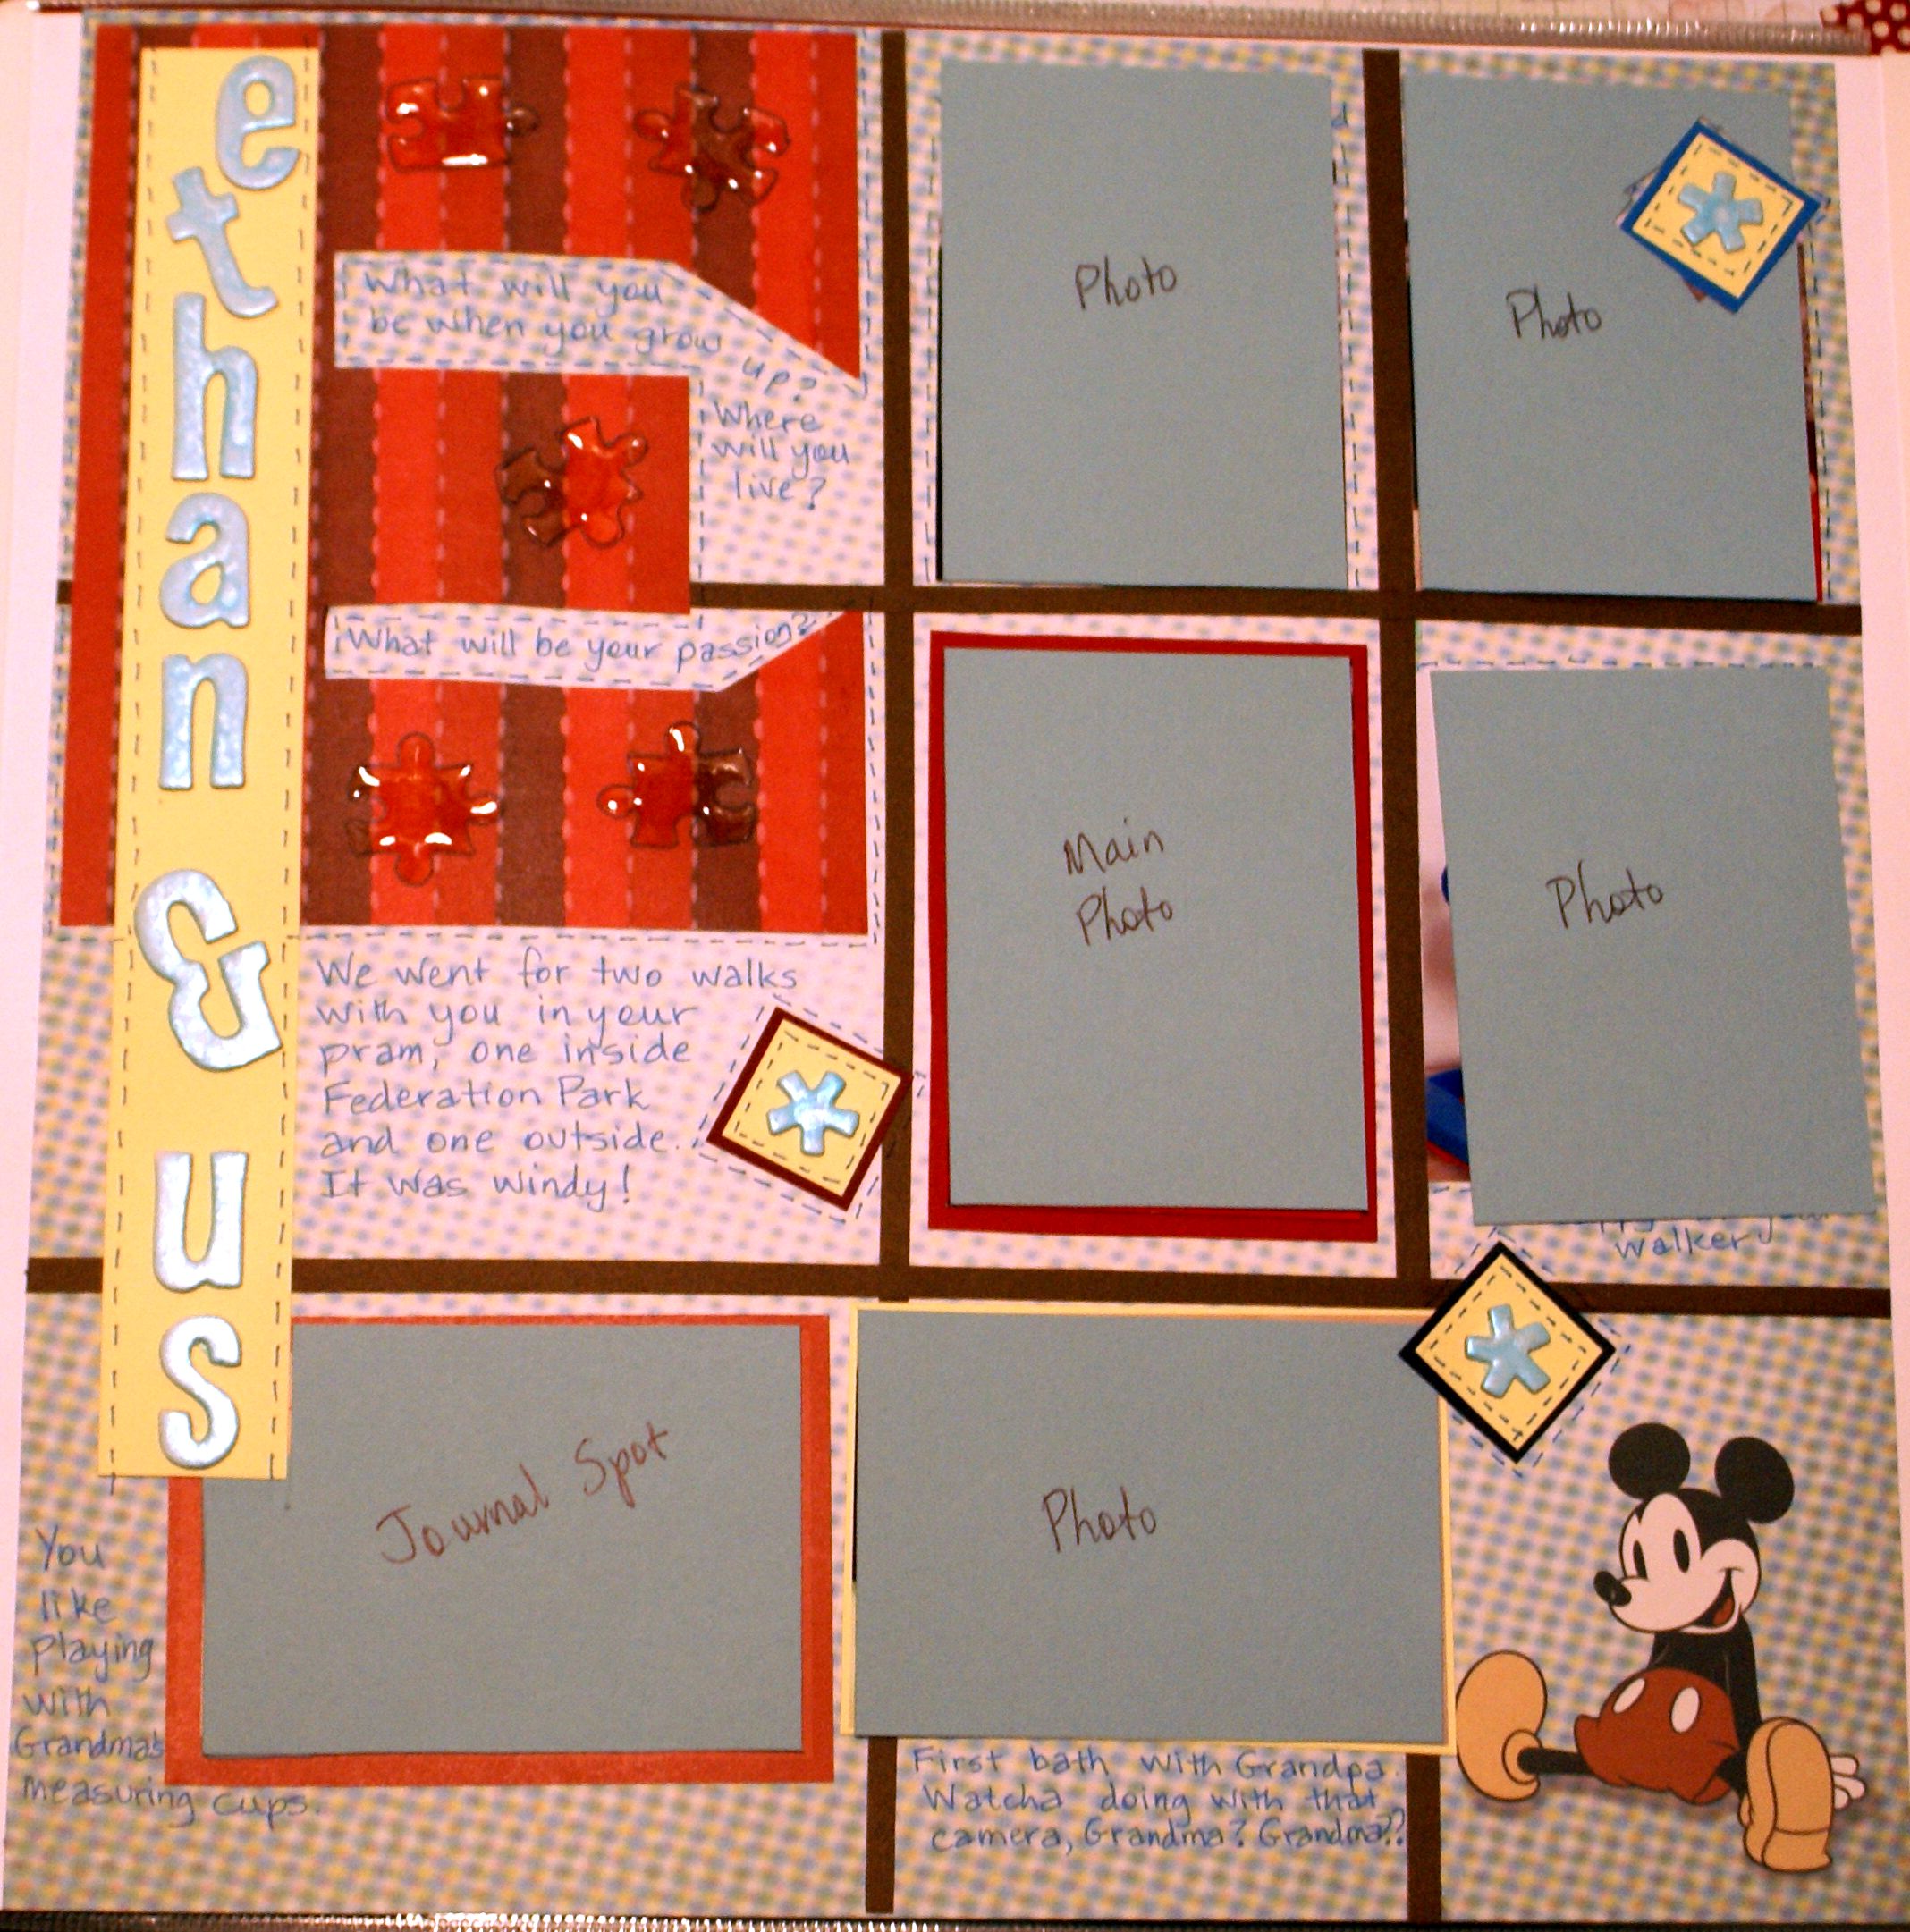
I was so thrilled that the evening of the challenge happened to be the first night we got to take care of our six month old grandson! That was enough of a special occasion for me, so I snapped some pictures of our boy for the layout (and just because he is so cute). I will add the photos later. Here is the way the layout came out:
The Thinking Behind the Layout:
Here's the thinking that went into Scrapbook Ideas 1 and the order in which I completed my album page:
I chose a Disney background paper because our little boy reminded me of the fun Mickey Mouse stands for. The background was plain but not boring - it is subtly patterned compared to a lot of my scrapbooking papers. And the grey-blue colours went with the primary colours I wanted to use as embellishment elements. I placed the whole paper on my work surface and started to think about the layout.
I had a number of smaller photos that I liked, but I wanted the focus to be on our boy. I decided the middle of the page was best for that. I picked the best photo of him and will place it in the middle. Then I thought I would frame up the rest of the pictures I wanted to use by cutting thin strips of dark brown paper and arranging them in a 'tic tac toe' game pattern. I didn't stick them to the page yet - I may need to move them before I was finished the page, right?
I finished arranging the photos I wanted in the frames, and matted the main picture with red and another with yellow. But I didn't fix them in place - not yet. I wasn't sure if I wanted to move them some more or not, so I left them more or less in position, resting on the page.
Then I made my inchies. The challenge only called for one inchie but I made three. All they are is squares of black, navy and red topped with smaller yellow squares, then I glued some painted asterisks on the centres.
Next I chose out my title letters from some chipboard and painted them with Radiant Rain Daubers. I used several coats of paint till I had the look I wanted. These needed to dry thoroughly. I also wanted to isolate them from the page just in case my chipboard was not photo safe, so only when they were dry I mounted them on some yellow cardstock.
To make the monogrammed letter, I chose some patterned paper and got out my pencil and ruler. I ruled up a large letter (the first letter of our boy's name) on the back of the paper, then cut it out and adhered it to the page. Voila!
Note: If you don't want to draw a monogram, you could also type up your letter on your computer and then run some patterned paper through your printer (cut it to fit) to get a similar effect. Make sure you mirror image your letter if you want to print it on the back of your patterned paper so it will read right when you cut it out.
On reflection I probably should have sponged the edges of the letter 'E' to make it stand out more, but by then it was too late. It was stuck down.
After I adhered the monogram, I added the painted chipboard title, then I adhered some clear puzzle stickers to the letter 'E'. I moved over the 'tic-tac-toe' lines to make room for the monogram (it was a good thing they weren't stuck down at that stage!) the title and the journalling box, which I wrote on next.
Once I had completed all of my decorative elements except for the inchies, I fixed the 'Tic-Tac-Toe' lines in place so they accommodated my picture sizes, and then I waited to adhere the pictures down as I might want to change their order one more time.
Finally I took a navy blue photo safe pen and doodled
faux stitching around the monogram, the inchies and a couple of the
pictures. I also journalled on the page some more with it but it was very faint and doesn't show up well. I might go over it in a darker colour.
Did you enjoy my instructions page for Scrapbook Ideas 1? I hope so! Why not take up the same challenge yourself and try making a page using the challenge elements? Your page will probably look totally different to mine, so I would love to see it.
Please do upload your page if you complete this challenge so I can see how yours turned out.
This completes Scrapbook Ideas 1.
Do You Have Scrapbook Page to Share?
Please do share your scrapbook layouts and projects below.
Return from Scrapbook Ideas 1 to Scrapbooking | Return to Papercraft Central Home Page


All brand names and product names used on this website are trade names, service marks, trademarks or registered trademarks of their respective owners. Also mentioned products or brand endorses this website. no mentioned products or brand endorses this website. Go to Privacy Policy to read more
PaperCraftCentral.com is a participant in the Amazon Services LLC Associates Program, and affiliate advertising program designed to provide us with earn fees to link to Amazon.com and affiliate sites.
Powered by Solo Build It!
New! Comments
Have your say about what you just read! Leave me a comment in the box below.