- Home
- Papercraft Adhesives
- Tissue Paper Craft
Tissue Paper Craft
Written and Created by PaperCraftCentral Susan
Here's a tissue paper craft idea for your empty (or not) plastic chocolate boxes.
This tissue paper craft idea is for use with a solid plastic box. Solid plastic boxes look so recyclable, don't they? Yet it can be a challenge to think of ways to reuse them. I am pleased to be able to let you know about one such way. See the instructions below.
"Chocolate. Here today, gone today!"
~Unknown chocoholic. Or was that me? (PaperCraftCentral Susan)

I first thought about decorating an empty chocolate box years ago, but the thought never went beyond an idle and passing one. Then one year a scrapping friend issued a challenge to our scrapping group. She wanted us to think of a way to make a gift box out of an empty plastic chocolate box. That meant I had to think a little harder and deeper about how to actually do this since my decorated box would also be given away as a gift to another member of the group.
There is pressure in a challenge, I agree, but it is the fun kind of pressure :)
There is a place for you to show me YOUR tissue paper craft ideas at the bottom of the page. Scroll down to find where to enter your own creation.
Tissue Paper Craft Project Instructions
Here is what I used:
- Various shades of tissue paper (the kind you would wrap a present in, not the kind you would wipe away your tears with)
- A thick, white glue that dries clear, like Gesso or Mod Podge
- A 1/2" to 1" paint brush
- A sturdy, clear plastic box like a Ferrero Roche box, empty at least while decorating
- Ribbon, rub ons, sparkle and glitz to taste
Here is what I did:
- First I made sure my box was completely clean. Any stickers and glued paper on the box needs to be removed. You can soak some stickers off in warm soapy water, or use a little Eucalyptus oil or other similar oil (even cooking oil works) to encourage stubborn adhesive to disappear. If your plastic box is not terribly clear, it will not look as good with this method of decorating it, though you can cover stubborn adhesives with other decorations like ribbon flowers if necessary
- Then I tore various shades of tissue paper into long-ish strips that would fit into the box easily. I was aiming to have strips that went from one end of the box to the other, though shorter strips overlapping looked good too
- Once I had my tissue paper ready, I covered the inside of the box with Gesso using the paint brush. Before it dried, I layered a piece of tissue onto it and brushed the tissue over with more Gesso
- I
continued to cover the inside of the box in this manner until I was
happy that I had covered the entire inside surface, avoiding the edges
where the lid fit closely to the body of the box.
- VERY IMPORTANT: Allow each layer of tissue and Gesso to dry completely before adding more, but be aware the box will not be as translucent with more layers. I went for one layer so the effect would be very translucent.
- You can sand or slice
away some overlaps of the paper with a craft knife if needed once everything is completely dry
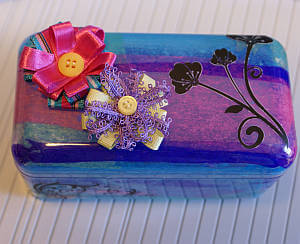
- After the Gesso had dried, I added more decorative elements such as the Rub On black flower
and some ribbon flowers with buttons that I also made.
- I then filled the completed box up with scrapping goodness to make sure it was definitely a gift box once it had dried. You can return the chocolates to your box instead if you have reserved them.
NOTE: You could decorate the box on the outside (instead of on the inside) with the strips of tissue and paste. I just wanted a smoother outside finish so chose to decorate the inside.
I think the box looks lovely in full light as light filters through the tissue paper layers.
If you have altered a plastic item such s this before, I hope you will show me how yours turned out. It would be fun to see other ideas for using the tissue paper craft idea as well.
Have A Favourite Altered Art Piece?
Do you have a piece of altered art you have created? I'd love to see it.


New! Comments
Have your say about what you just read! Leave me a comment in the box below.