- Home
- Papercraft Adhesives
- Card Layouts
Card Layouts
Written and Created by PaperCraftCentral Susan
Five Easy Card Layouts for you
Thank you for subscribing to Paper Twists. The five card layouts I promised you are on this page.
You can use these simple card layouts over and over again. Change up the Designer Series paper, stamped images, sentiments and embellishments to create cards that look quite different to each other.
The designs of these layouts are rather timeless! And you only need a sheet of 6"x 6" designer series paper to go with your card bases and other elements or embellishments.
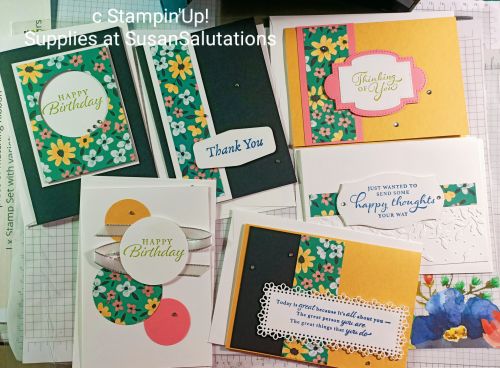
Here's one version of the cards I made using these templates. You will see I made six cards instead of five! I wonder if you can see how to make the sixth card after you have made the first five?
6 x 6 One Sheet Wonder Cards
First, choose the designer series paper (DSP) you want to use.
Cut your 6” x 6” DSP like this:

Supplies to make five card layouts are listed next.
Again, feel free to substitute your own DSP , stamps, cardstock colours etc.
I recommend you label the parts you cut with the numbers of the cards to keep them straight.
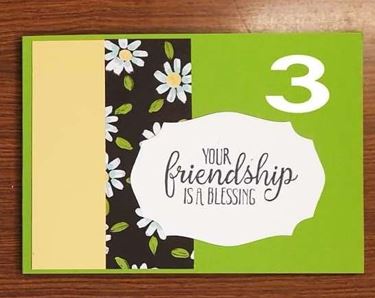
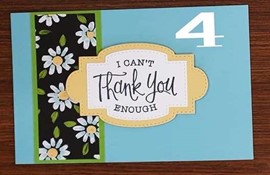
The next lot of cards were made by Sharon Dalton to show how changing cardstock and DSP can make the cards all look very different.
Thank you for this, Sharon!
There are big numbers on each card. The numbers are not part of the finished design. Lol! They are to help you keep in mind which card you are working on and to match the DSP pieces you cut to the right card.
Here goes:
Card Layout #1

Cardstock/DSP Imperial /Metric
Pool Party A = 1 x 8 ¼” x 5 ¾” A = 1 x 20.9cm x 14.6cm A = 1 x 8 ½” x 5 ½”
Scored & folded in half
Basic White B = 1 x 4” x 3” B = 1 x 10.1cm x 7.6cm B = 1 x 4” x 3”
DSP C = 1 x 5 ¾” x ¾” C = 1 x 14.6cm x 1.9cm D = 1 x 5 ½” x ¾”
Step by Step Instructions
1 Optional – Emboss front of A – Pool Party Base Card with Embossing Folder of choice
2 Adhere C – DSP across centre of Card Front trimming sides if necessary
3 Stamp sentiment of choice direct onto B – Basic White in Memento Tuxedo Black Ink
4 Die cut with shape from Tasteful Labels Dies
5 Adhere to centre of Card Front with Stampin’ Dimensionals
6 Optional – Embellish with Rhinestones, etc
Card Layout #2

Measurements A4 SIZE LETTER SIZE
Cardstock/DSP Imperial/Metric
So Saffron A = 1 x 8 ¼” x 5 ¾” A = 1 x 20.9cm x 14.6cm A = 1 x 8 ½” x 5 ½”
Scored & folded in
half
Basic White B = 1 x 1 1 3/8” x 5 ¾” B = 1 x 3.4cm x 14.6cm B = 1 x 1 ½” x 5 ½” C = Scrap for die cut C = Scrap for die cut C = Scrap for die cut shape shape shape
DSP D = 1 x 1 ¼” x 5 5/8” D = 1 x 3.1cm x 14.2cm D = 1 x 1 ¼” x 5 ¼”
Step by Step Instructions
1 Adhere D – DSP to B – Basic White leaving narrow edge of Basic White showing around all 4 sides
2 Adhere to left side of A – So Saffron Base Card
3 Die cut shape of choice from C – Scrap Basic White with Tasteful Labels Dies
4 Stamp sentiment of choice in Memento Tuxedo Black Ink
5 Adhere to lower right of Card Front overlapping DSP strip a little with Stampin’ Dimensionals
6 Optional – Embellish with Rhinestones, etc
Card Layout #3
Cardstock/DSP Imperial Metric
Granny Apple Green A = 1 x 11 5/8” x 4 1/8” A = 1 x 29.5cm x 10.4cm A = 1 x 11” x 4 ¼”
Scored & folded in
half
Basic White B = 1 x 4” x 3” B = 1 x 10.1cm x 7.6cm B = 1 x 4” x 3”
So Saffron C = 1 x 1 ½” x 4” C = 1 x 3.8cm x 10.1cm D = 1 x 1 ½” x 4”
DSP D = 1 x 1 ½” x 4” D = 1 x 3.8cm x 10.1cm D = 1 x 1 ½” x 4”
Step by Step Instructions
1 Adhere C – So Saffron to left side of A – Granny Apple Green Base Card leaving even amount of space top, bottom & left side
2 Adhere D – DSP to right side of So Saffron Cardstock ensuring it is in line top & bottom
3 Stamp sentiment of choice direct onto B – Basic White in Memento Tuxedo Black Ink
4 Die cut with die from Stitched So Sweetly Dies
5 Adhere to lower part of Card Front with Stampin’ Dimensionals
6 Optional – Embellish with Rhinestones, etc
Card Layout #4
Cardstock/DSP Imperial Metric
Pool Party A = 1 x 8 ¼” x 5 ¾” A = 1 x 20.9cm x 14.6cm A = 1 x 8 ½” x 5 ½”
Scored & folded in half
Granny Apple Green B = 1 x 1 5/8” x 4 1/8” B = 1 x 4.1cm x 10.4cm B = 1 x 1 ¾” x 4 ¼”
DSP C = 1 x 1 ½” x 4” C = 1 x 3.8cm x 10.1cm C = 1 x 1 ½” x 4”
So Saffron D = 1 x 4” x 3” D = 1 x 10.1cm x 7.6cm D = 1 x 4” x 3”
Basic White E = 1 x 3” x 3” E = 1 x 7.6cm x 7.6cm E = 1 x 3” x 3”
Step by Step Instructions
1 Adhere C – DSP to B – Granny Apple Green leaving small even colour showing around all sides
2 Adhere to left side of A – Pool Party Base Card leaving about ½” or 3.8cm showing down
left side
3 Stamp sentiment of choice direct onto E – Basic White in Memento Tuxedo Black Ink
4 Die cut with shape from Stitched So Sweetly Dies
5 Die cut larger shape from D – So Saffron with Stitched So Sweetly Dies
6 Adhere Basic White shape to centre of So Saffron shape
7 Adhere to Card Front with Stampin’ Dimensionals
8 Optional – Embellish with Rhinestones, etc
Card Layout #5
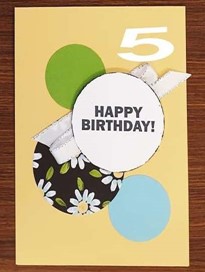
So Saffron A = 1 x 8 ¼” x 5 ¾” A = 1 x 20.9cm x 14.6cm Scored & folded in half
Basic White B = Scrap for punched B = Scrap for punched circle
DSP C = 1 x 2 ¼” punched C = 1 x 5.7cm punched circle as per DSP Layout circle as per DSP Layout
Pool Party D = Scrap for punched D = Scrap for punched circle
Granny Apple Green E = Scrap for punched E = Scrap for punched circle
Step by Step Instructions
1 Punch circle from D – Scrap Pool Party with 1 ½” Circle Punch prior to adhering lower right side of A – So Saffron Base Card – refer photo for placement
2 Punch circle from E – Scrap Granny Apple Green with 1 ½” Circle Punch prior to adhering top left side of A – So Saffron Base Card – refer photo for placement
3 Adhere C – punched DSP circle to just below left centre of A – So Saffron Base Card
Tip –
The DSP punched circle is from the DSP piece for Cards #5 & 6 – refer DSP Layout above
A = 1 x 8 ½” x 5 ½” , scored and folded in half
B = scrap for punched circle
C = scrap for punched circle
D = Scrap for punched circle
Ask a Friend to Subscribe to Paper Twists
If you want to share the love, do share the Subscribe page with a crafting friend. Let them know about the project ideas, tips and news you get and let them join the fun!


All brand names and product names used on this website are trade names, service marks, trademarks or registered trademarks of their respective owners. Also mentioned products or brand endorses this website. no mentioned products or brand endorses this website. Go to Privacy Policy to read more
PaperCraftCentral.com is a participant in the Amazon Services LLC Associates Program, and affiliate advertising program designed to provide us with earn fees to link to Amazon.com and affiliate sites.
Powered by Solo Build It!
New! Comments
Have your say about what you just read! Leave me a comment in the box below.