- Home
- Papercraft Adhesives
- Paper Twists Freebies
Paper Twists Freebies
Written and Created by PaperCraftCentral Susan
If you are reading this Paper Twists Freebies page, congratulations! You are most likely a subscriber to Paper Twists, the monthly mailout from Susan at PaperCraftCentral.com
This is where Susan will place special Paper Twists freebies and files available only for subscribers.
If you have not yet subscribed, go to the Subscribe page and you will start to receive the monthly mailout which has unique projects, tips, ideas and news that is exclusive for subscribers to Paper Twists. And you will get notice of future Paper Twists freebies too.
If you have friends who would enjoy a monthly dose of papercraftcntral inspiration, please do let them know how to subscribe. Tell them about the Paper Twists freebies as well. I like to look after people who subscribe.
And thank you for subscribing!
Please note: You will need Adobe Acrobat Reader or another PDF Reader app on your computer, phone, tablet or laptop to download, print or read any PDFs created for you. Most Paper Twists freebies will be posted on this page though.
NOTE: Paper Twists Freebies may be replaced by new ones at any time.
Paper Twists Freebies
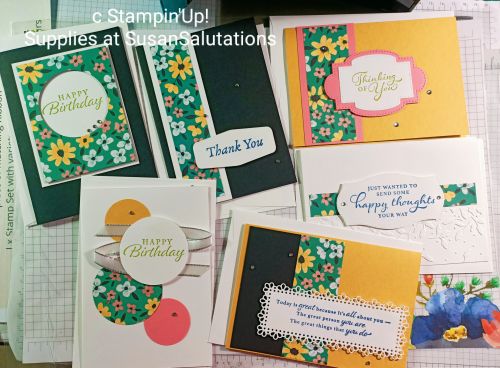
To see the templates to make these five cards, scroll down to the instructions below. A class like this would usually cost at least $30 with supplies, but you are getting these instructions for free!
Collaborators for these projects were Kim Gavarra and Sharon Dalton. Thank you, my friends.
Enjoy your Paper Twists freebies!
6 x 6 One Sheet Wonder Cards
First, choose the designer series paper (DSP) you want to use.
Cut your 6” x 6” DSP like this:
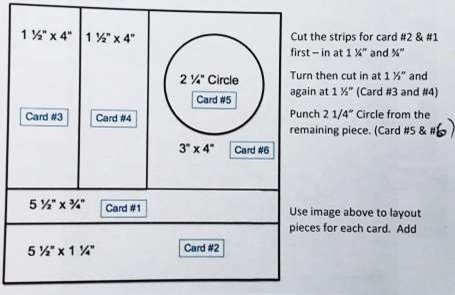
Supplies to make five cards are listed below. Feel free to substitute your own DSP , stamps, cardstock colours etc. Just label the parts you cut with the numbers of the cards to keep them straight.
Stamps Tasteful Touches So Sentimental
Inks Memento Tuxedo Black
Cardstock Basic White Granny Apple Green So Saffron Pool Party
DSP Flower & Field
Embellishments - Optional
Ribbon – Optional
Punch 2” Circle 2 ¼” Circle 1 ½” Circle
Embossing Folders – Optional
Dies Tasteful Labels and Stitched So Sweetly
Tools Stampin’ Cut & Emboss Machine Simply Scored Scoring Tool Paper Trimmer Bone Folder
Adhesives Multipurpose Liquid Glue Stampin’ Seal Stampin’ Dimensionals
Card #1
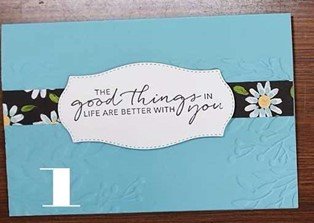
Cardstock/DSP Imperial Metric
Pool Party A = 1 x 8 ¼” x 5 ¾” A = 1 x 20.9cm x 14.6cm A = 1 x 8 ½” x 5 ½”
Scored & folded in half
Basic White B = 1 x 4” x 3” B = 1 x 10.1cm x 7.6cm B = 1 x 4” x 3”
DSP C = 1 x 5 ¾” x ¾” C = 1 x 14.6cm x 1.9cm D = 1 x 5 ½” x ¾”
Step by Step Instructions
1 Optional – Emboss front of A – Pool Party Base Card with Embossing Folder of choice
2 Adhere C – DSP across centre of Card Front trimming sides if necessary
3 Stamp sentiment of choice direct onto B – Basic White in Memento Tuxedo Black Ink
4 Die cut with shape from Tasteful Labels Dies
5 Adhere to centre of Card Front with Stampin’ Dimensionals
6 Optional – Embellish with Rhinestones, etc
Card #2
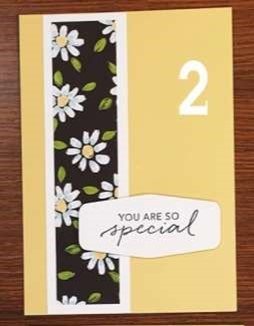
Measurements A4 SIZE LETTER SIZE
Cardstock/DSP Imperial Metric
So Saffron A = 1 x 8 ¼” x 5 ¾” A = 1 x 20.9cm x 14.6cm A = 1 x 8 ½” x 5 ½”
Scored & folded in half Scored & folded in half Scored & folded in half
Basic White B = 1 x 1 1 3/8” x 5 ¾” B = 1 x 3.4cm x 14.6cm B = 1 x 1 ½” x 5 ½” C = Scrap for die cut C = Scrap for die cut C = Scrap for die cut shape shape shape
DSP D = 1 x 1 ¼” x 5 5/8” D = 1 x 3.1cm x 14.2cm D = 1 x 1 ¼” x 5 ¼”
Step by Step Instructions
1 Adhere D – DSP to B – Basic White leaving narrow edge of Basic White showing around all 4 sides
2 Adhere to left side of A – So Saffron Base Card
3 Die cut shape of choice from C – Scrap Basic White with Tasteful Labels Dies
4 Stamp sentiment of choice in Memento Tuxedo Black Ink
5 Adhere to lower right of Card Front overlapping DSP strip a little with Stampin’ Dimensionals
6 Optional – Embellish with Rhinestones, etc
Card #3
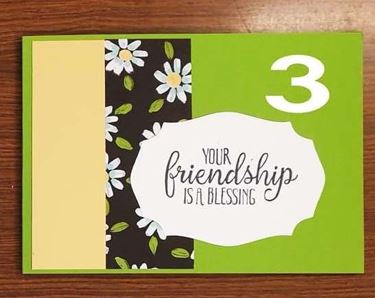
Cardstock/DSP Imperial Metric
Granny Apple Green A = 1 x 11 5/8” x 4 1/8” A = 1 x 29.5cm x 10.4cm A = 1 x 11” x 4 ¼”
Scored & folded in half Scored & folded in half Scored & folded in half
Basic White B = 1 x 4” x 3” B = 1 x 10.1cm x 7.6cm B = 1 x 4” x 3”
So Saffron C = 1 x 1 ½” x 4” C = 1 x 3.8cm x 10.1cm D = 1 x 1 ½” x 4”
DSP D = 1 x 1 ½” x 4” D = 1 x 3.8cm x 10.1cm D = 1 x 1 ½” x 4”
Step by Step Instructions
1 Adhere C – So Saffron to left side of A – Granny Apple Green Base Card leaving even amount of space top, bottom & left side
2 Adhere D – DSP to right side of So Saffron Cardstock ensuring it is in line top & bottom
3 Stamp sentiment of choice direct onto B – Basic White in Memento Tuxedo Black Ink
4 Die cut with die from Stitched So Sweetly Dies
5 Adhere to lower part of Card Front with Stampin’ Dimensionals
6 Optional – Embellish with Rhinestones, etc
Card #4
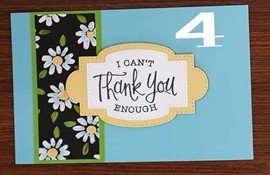
Cardstock/DSP Imperial Metric
Pool Party A = 1 x 8 ¼” x 5 ¾” A = 1 x 20.9cm x 14.6cm A = 1 x 8 ½” x 5 ½”
Scored & folded in half Scored & folded in half Scored & folded in half
Granny Apple Green B = 1 x 1 5/8” x 4 1/8” B = 1 x 4.1cm x 10.4cm B = 1 x 1 ¾” x 4 ¼”
DSP C = 1 x 1 ½” x 4” C = 1 x 3.8cm x 10.1cm C = 1 x 1 ½” x 4”
So Saffron D = 1 x 4” x 3” D = 1 x 10.1cm x 7.6cm D = 1 x 4” x 3”
Basic White E = 1 x 3” x 3” E = 1 x 7.6cm x 7.6cm E = 1 x 3” x 3”
Step by Step Instructions
1 Adhere C – DSP to B – Granny Apple Green leaving small even colour showing around all sides
2 Adhere to left side of A – Pool Party Base Card leaving about ½” or 3.8cm showing down
left side
3 Stamp sentiment of choice direct onto E – Basic White in Memento Tuxedo Black Ink
4 Die cut with shape from Stitched So Sweetly Dies
5 Die cut larger shape from D – So Saffron with Stitched So Sweetly Dies
6 Adhere Basic White shape to centre of So Saffron shape
7 Adhere to Card Front with Stampin’ Dimensionals
8 Optional – Embellish with Rhinestones, etc
Card #5
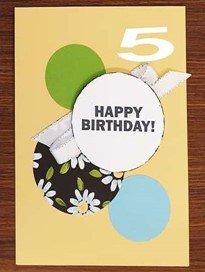
So Saffron A = 1 x 8 ¼” x 5 ¾” A = 1 x 20.9cm x 14.6cm Scored & folded in half
Basic White B = Scrap for punched B = Scrap for punched circle
DSP C = 1 x 2 ¼” punched C = 1 x 5.7cm punched circle as per DSP Layout circle as per DSP Layout
Pool Party D = Scrap for punched D = Scrap for punched circle
Granny Apple Green E = Scrap for punched E = Scrap for punched circle
Step by Step Instructions1 Punch circle from D – Scrap Pool Party with 1 ½” Circle Punch prior to adhering lower right side of A – So Saffron Base Card – refer photo for placement
2 Punch circle from E – Scrap Granny Apple Green with 1 ½” Circle Punch prior to adhering top left side of A – So Saffron Base Card – refer photo for placement
3 Adhere C – punched DSP circle to just below left centre of A – So Saffron Base Card
Tip –
The DSP punched circle is from the DSP piece for Cards #5 & 6 – refer DSP Layout above
A = 1 x 8 ½” x 5 ½” , scored and folded in half
B = scrap for punched circle
C = scrap for punched circle
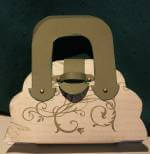
Purse Template
To see the Paper Twists freebie purse template you earned by subscribing in the first place, click through to the Purse Template page.
Enjoy these Paper Twists Freebies!


New! Comments
Have your say about what you just read! Leave me a comment in the box below.