- Home
- Papercraft Adhesives
- Quilled Flowers
Quilled Flowers
Written and Created by PaperCraftCentral Susan
Quilled flowers are fun to make and not hard to create at all. I learned to make some lovely ones on a cruise would you believe. I can now make paper daisies in a matter of minutes and they can add a lot to your papercraft projects. You can make these too. Let me show you how.
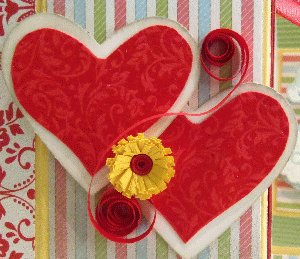
How to Make Quilled Flowers
All you need to make these flowers is a slotted quilling tool, some strong paper glue like Tombow and some strips of thin paper made especially for use with the tool. Paper strips come in different widths, so simply choose a thin one and a thicker one. The thin one will be the centre of the flower and the thicker one will be its petals.
If you need to buy quilling tools of your own, I have provided some links to some in the right hand column for you and on the Papercraft Supplies page.
NOTE: If you are making your own strips, ordinary cardstock will not work too well with this technique as it is too thick. Some designer series papers might work. You need to use paper that is more like copy paper (printer paper) weight and the thin strips must be very evenly cut or they will not wind evenly. The thicker you cut the strips, the higher the finished flower will stand up.
You will need a slotted quilling tool. It will have a groove in the side of the needle part where you can slot in the paper. Take half a strip of the thin paper and insert the end in the tool's slot. Then just roll it evenly onto the needle, keeping it from spiraling down the shaft. You want a nice, tight little circle of rolled paper in the end.
I chose red for my centre piece. Once I rolled it up I quickly applied some paper glue to the end (I used my Tombow Glue from Stampin' Up! It is so convenient to use. But any paper glue will be fine as long as it dries clear. If you need some, you can order form my SusanSalutations store). Only use a smudge of glue as it will squish out if you use too much and form a bead. You want the result to be nice and smooth and flat like it is in the picture below.
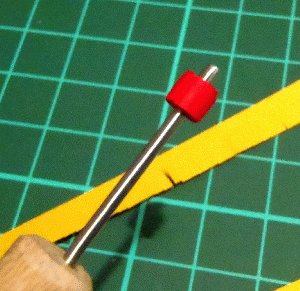
Leave the finished centre on the needle and set it aside. Now turn your attention to the wider strip of paper. It will become your daisy's petals. Just use half a strip for this bit as well.
Before you roll it, take your paper snips and cut a fringe along the length, tapering it a bit (make shallower cuts) at one end. You can see how I made my cuts in the top yellow strip of paper in the photo below.
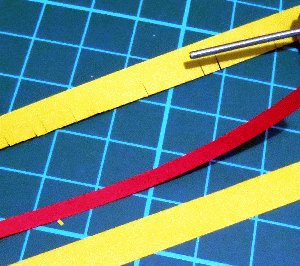
Next pick up the needle with the centre still on it and carefully glue the shallow fringed end to the centre, then roll it on around the centre bit. Glue the end down so it will stay tightly wound. You will wind up with something that looks like this:
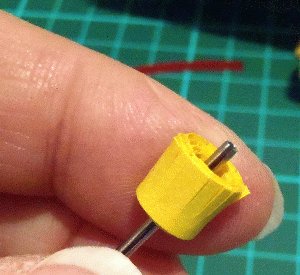
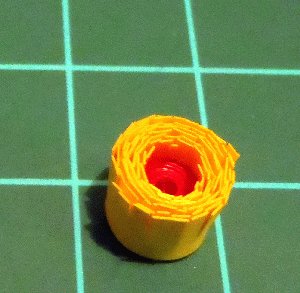
Now you can remove your flower from the tool and carefully, gently, start spreading the petals out from the centre.
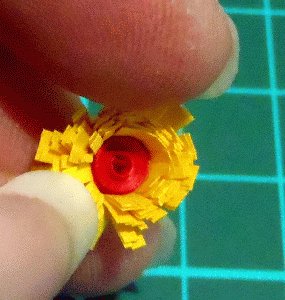
Keep gently spreading out those petals till you get the look you want. The red centre will appear for you and the rolled papers form a nice base for the daisy. You can then apply some Tombow glue to the bottom of the piece and place it on your project. Voila!
You will probably find making this type of bloom addictive once you get the basics sorted out!
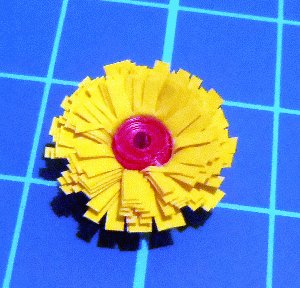
Make heaps of quilled flowers (daisies) for your next decorative box, scrapbook album or handmade greeting card and enjoy their beauty.
Here are some other quilling ideas too.
Do show me your project once you have created it.
Have fun!
Do You Have A Paper Flower Idea To Share?
Do you have a paper flower idea? I'd love to see it!
Return from Quilled Flowers to How to Make Paper Flowers | Return to PaperCraftCentral Home Page


New! Comments
Have your say about what you just read! Leave me a comment in the box below.