- Home
- Papercraft Adhesives
- Special Birthday Cards
Happy 30th Birthday
Written and Created by PaperCraftCentral Susan
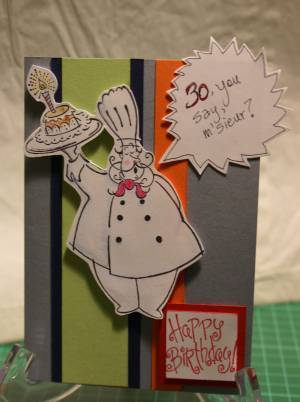
I made a Happy 30th Birthday card for one of my husband's workmates and thought I'd share it with you.
"After 30, a body has a mind of its own"
~Bette Midler

How to Make My Happy 30th Birthday Card
To make this handmade greeting card for a young man turning 30, I used strips of coloured paper as the background and then made a feature of the stamped chef image. All stamps are from Stampin' Up! from a retired set called "Voila!" Every now and then, Stampin' Up! brings back a chef image though, like it has in the 2023-2024 Ideas Book and Catalogue, but you could use any image you like that would appeal to the person you are making your card for.
Here's how I made my card. Note: Use these instructions as a general idea for your own cardmaking regardless of whether or not you have the particular supplies I used, OK?
On to the card instructions:
First I stamped the chef and the cake in black Stazon ink on Basic White cardstock. I used my Stamp-a-ma-jig (stamp positioning tool) to position the cake just right on the platter since it was a separate stamp to the chef. You could also use your Stamparatus (retired) to make perfect stamped image placements.
The outlined image needed a little bit of colour to lift it so I got out my Water Colour Wonder crayons (retired) but could have used a bit of ink from my ink pads or watercolour pencils or alcohol ink Blends instead, and an aqua pen and coloured in the cake, the chef's tie, and added some subtle shading where I thought there should be shadows.
Note: If you want to know more about adding shading and highlights to your stamped images, you can pick up some Beginner's Tips to Shading here. All I personally do is imagine a light coming from one corner of my image. Then I imagine where the shadows would fall based on that unwavering light.
I gave the chef some colour in his cheeks too. Well, wouldn't you be flushed if you were working over a hot stove? So was my chef, I decided.
Next I stamped the Happy Birthday sentiment in red on white cardstock, punched it out with a square punch and inked the edges in red.
Then I mounted my sentiment to a piece of Real Red card stock punched out to be a square a little bit bigger than my stamped image. I placed the sentiment with my Stamp-A-Ma-Jig on the bottom right hand corner of my card using some Stampin' Dimensionals.
I popped the chef up with some more Stampin' Dimensionals and placed him near the centre of the card.
After that I wrote out my question. That is, instead of just saying Happy 30th Birthday, I asked him a question instead, (in a French accent in my head of course) and drew a jagged thought balloon around it freehand, then coloured in the number 30 to match the Real Red cardstock.
I cut this out and adhered it over the edge of the top right hand corner of the card.

Now you might like to see .
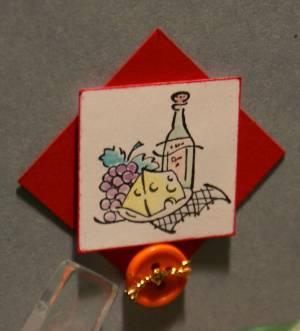
I decided to embellish the inside front cover of the card just a little bit. Taking some more Real Red card stock, I punched out another square.
Then I used another small stamp of the wine and cheese shown above from the "Voila" stamp set and stamped it onto Basic White cardstock.
Using the Water Colour Wonder crayons (or ink/watercolour pencils) and the aqua pen, I coloured the image in a little and inked the edges of the image in red.
Be mindful of where shadows might fall if you really want to amp up your colouring technique, and add a little shadow around the outside edges of your image to make it seem to pop off the page a little.
I mounted the image diagonally on the Real Red card stock and adhered it to the bottom centre of the front cover with more Stampin' Dimensionals.
I found an orange button and some gold cord, threaded the cord through the button and knotted it, then attached this to the bottom of the popped up image.
And the sentiment inside the card? I wrote 'UNBELIEVABLE!' in freehand above the stamped words "Bon Appetit!"
The aqua pen and crayons or ink make creating this card a cinch! Of course, this was a Happy 30th Birthday card, but you could change the sentiment balloon to read anything at all to match any occasion.
As the Voila stamp set is retired, choose another image for your card. You can find some beautiful new stamps by following the link to my SusanSalutations Stampin' Up! store.
If you would like more ideas to make special cards, follow this link to discover some other special occasion card tutorials and ideas.


New! Comments
Have your say about what you just read! Leave me a comment in the box below.