- Home
- Papercraft Adhesives
- Dry Embossing
Dry Embossing
Written and Created by PaperCraftCentral Susan
I think dry embossing gives a subtle, softer look to your papercraft projects. It also creates a lot of texture and interest in white spaces.
Definition: "embossed - brocaded: embellished with a raised pattern
created by pressure or embroidery;
"brocaded silk"; "an embossed satin"; "embossed leather"; "raised ..."
~Wikipedia
Dry Embossing by hand is so easy to do and can add a real
professional touch to your handmade greeting cards and other craft projects. It is a different technique to heat embossing. You do not get a shiny result with this technique.
You can also dry emboss using a Big Shot machine and embossing folders. I talk about both methods on this page.
Manual Dry Embossing

You can buy brass templates and embossing tools from
most papercraft stores. The templates come in a variety of patterns,
shapes and sizes. I have my eye on a lovely dragon one, actually. One
day it may come to live in my craft cupboard. I think working with a Big Shot machine
or Die Cut and Embossing Machine is a perfect way to create this look, but you can also create it with
the brass templates. I'll tell you how to use the templates here.
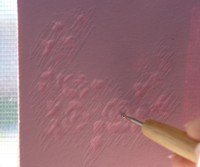
In the picture at the top of the page you can just see the shadow of my brass template behind the paper I am working on.
How to Create Dry Embossing Projects by Hand
- Select cardstock, brass template like a hummingbird one and select a round knobbed tool
- Find a window with lots of light behind it, or if you have one, use a Light Box
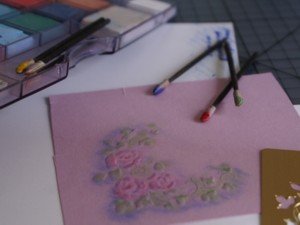
- Tape or blue-tack the template to the window at a comfortable height for you to work on. In the image above you can see I've chosen a brass rose template and it is under the cardstock I am working on (you can see a corner of the template on the lower right in the picture at the bottom of the cardstock)
- Place the cardstock over the template where you want your finished design to appear
- Run the stencil tool firmly over the template and cardstock, making sure you rub all metal edges of the images with the tool. Work by rubbing the tool in one direction all over the paper, then return and cross-hatch the image with the tool if desired. Be careful not to press too hard or your tool may go through the paper. Keep the knob slanted instead of straight up and down.
- Remove the template from the cardstock, turn the paper over so the raised side is facing upwards and use the image as desired. In this case I have chalked my design.

Many people have light boxes and use them to see the template behind their cardstock instead of a window. This may be a lot more comfortable for you to use, if you have one. You can also just raise the outline of your image by running your tool only along the edge of the designs instead of cross hatching them.
Other things to try with this technique:
Look for unusual 'templates' to try such as:
- the edges of tearing rulers
- leaves
- holding your cardstock over an etched design on a vase, for example, and using it as a template
- Coins
Be inventive and enjoy your manual dry embossing experiments.
Machine Dry Embossing
Once you have tried the manual embossing technique you may want to branch out and consider purchasing a Die Cut and Embossing machine. I can honestly say I use mine all the time. You would then be able to expand your papercrafting to include die cutting and machine embossing. It is so quick, easy and convenient to have such a machine from Stampin' Up!
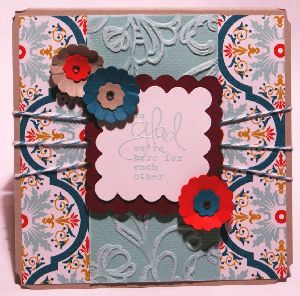
There is an example of a raised image created by the Die Cut and Embossing machine below. The light blue cardstock mat has been run through the machine with an embossing folder.
Remember to Contact Me if you have any questions or inquiries about the techniques or products used here.

To use textured embossing folders, follow the instructions on the Stampin' Up! packaging that comes with the Die Cutting and Embossing Machine to make a 'sandwich' with the embossing plates. In most cases, you will use the main platform, a B Plate, the embossing folder in which you have placed your cardstock, and another B Plate.
Roll the entire sandwich through the machine. Take out your impressed cardstock and use it as an element on your card.
There are both textured and dynamic embossing folders available in the new Stampin' Up! catalogue.
Dynamic embossing folders are thicker than textured ones are and will give you a deeper impression. To use them, you only need the Die Cutting and Embossing platform, the dynamic embossing folder, a piece of cardstock inside the folder, and one B Plate on top.
More Tips and Ideas:
- Sometimes it helps to spritz your cardstock with water before running it through a Big Shot sandwich. This makes the paper fibers more pliable so the folder will give a better impression.
- Try inking your images and stamping on your embossing folders
- Try embedding layers with your folders
Here is a little video showing you how to use dynamic textured embossing folders from Stampin' Up!:
I hope you enjoy using some of these techniques to enhance your paper projects. Remember you can use raised elements on scrapbook pages, 3-d projects like boxes and flowers as well.


New! Comments
Have your say about what you just read! Leave me a comment in the box below.