- Home
- Papercraft Adhesives
- Faux Velvet Technique
Faux Velvet
Written and Created by PaperCraftCentral Susan
Try out the faux velvet technique the next time you want to make a soft element for a hand made card, scrapbook page or other papercraft project.
I saw this technique described in the Australian Cardmaking, Stamping and Papercraft magazine and just had to try it out. Thanks to Jane Clark for the inspiration ☺
Scroll down to see the instructions below.

How to Make Faux Velvet
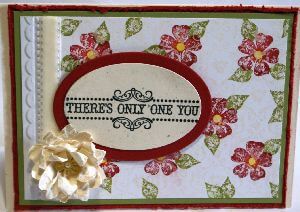
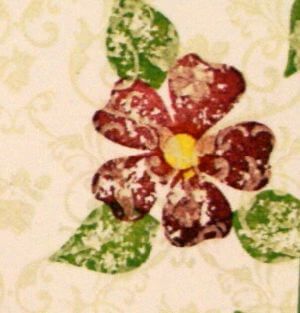
It is a little hard to tell what the faux velvet looks like in the image posted above showing the whole card, but I have given you a detailed picture below.
It really is a very pretty and subtle stamping method with the added appearance of soft texture. It's really an optical illusion! The technique is done with stamping only, and it LOOKS like a three dimensional technique due to white shadow stamping. I just love it when we can use our stampin' supplies to create something that mimics another material.
I love that it adds a visual element to our crafting that makes a person want to touch it and see if it is real fabric or paper.
For this technique, you will need the following supplies or similar:
- Smooth white cardstock (I used Stampin' Up!'s Basic White. All supplies used were from Stampin' Up! in fact)
- A detailed background stamp that is on the smallish size (I used a flower stamp from the Parlor Prints stamp set, now retired)
- Solid fill stamps as opposed to images with only outlines. I used solid flowers and leaves in my sample, from a retired Vintage stamp set that I love.
- Craft White ink (Check to see if this ink has dried out between uses. It is an ink that dries more than others do. That's why it's a good idea to purchase a Craft White Ink refill when you buy the pad).
- Classic ink pads in other contrasting colours. Cherry Cobbler was what I used for my flowers and Old Olive was used for my leaves .
Here's what to do:
Let's walk through it step by step. This step is where you will take the cardstock layer you want to use as a background on your card.
- Stamp your background all over with the white craft ink and dry it thoroughly with a heat tool
- Now stamp contrasting shapes over the top of the dried background image.
- NOTE: Be sure to thoroughly clean your stamp between impressions as your images will not be as good over the white ink if you skip this step. White ink takes on any hint of other colours! And you may pick up some white ink even though it is dry as the wetness of the new colour you are using may reactivate the white.
You will have traces of the white inked images showing through your solid fill images, just as though the image had been stitched like velvet sometimes is.
I think this technique makes your decorated layer very soft and pretty!

The closeup image shows how the background comes through the solid fill images and how much like fabric the paper now seems.
One of my card class ladies even said she thought the background WAS made of fabric when she saw my card for the first time.She was keen to try this technique out! So we did.
To add to the softness, I used a pretty Needlepoint Border embossing folder (retired) for the unstamped edge of my white background layer and added a piece of velvet ribbon, along with a faux suede flower. The flower has a flower brad in its middle, topped with a Pearl Basic Jewel.I just thought the velvet ribbon added to the idea that I had used velvet as a background layer.
I chose some of the Cream Confetti cardstock (retired) for both the flower and for the card base.In fact you may find Very Vanilla cardstock is a great alternative to Basic White cardstock for this card. It would give your card a more antique feel.
Then I die cut the oval shapes with my Stampin' Cut and Emboss Machine after stamping and heat embossing my sentiment with Black Embossing Powder.
Another idea is that you could make some flowers using this technique then punch them out or die cut them, or try the tearing technique to finish your images off.
Faux velvet elements would look so sweet on a scrapbook page or as decorations for a gift box, don't you think?
If you liked this technique, you might also like to make faux silk, faux metal or faux suede.
I hope you do try the faux velvet technique sometime and show me the result! All you need do is to add your project photo and a few comments to the form below:
Do You Have A Favourite Handmade Card to Share?
Do you make greeting cards? Please do share it with me.


New! Comments
Have your say about what you just read! Leave me a comment in the box below.