- Home
- Papercraft Adhesives
- Card Idea for Graduation Ceremony
Graduation Wishes
Written and Created by PaperCraftCentral Susan
A graduation wishes card is something that many people treasure. Hand made greeting cards that celebrate the attainment of a qualification or achievement can be very significant and appreciated!
A graduation wishes card does not have to fit in an envelope either. Why not make a special one with a custom made box to house it?
The instructions for making a banner card by using an accordion fold to fit it into the box are on another page, but the instructions for making a footlocker box can be found below.
"
Go confidently in the direction of your dreams. Live the life you have imagined".
~Henry David Thoreaux

When I wanted to make a card for someone special who had just finished their basic training in the military, I immediately thought of my Dad's old footlocker. All of my young life he had dragged that footlocker with us as we moved around the world. It seemed to be something he attached special importance to.
Naturally, my thoughts next led to me think how I could make a footlocker out of cardstock. I don't know if Aussie soldiers still use these but it's a novel way to present a handmade greeting card anyway, right?
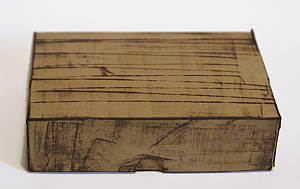
Making a footlocker box isn't too difficult. All you need is a paper box made out of khaki coloured paper and some ink, and a scoring tool helps.
You may also like to use a small circle punch.
How to Make a Graduation Wishes Footlocker
Here's how I made my card box:
- First, make the box to fit the card project you have in mind (or make
the card then make the box to fit it). Take measurements from your card to make sure your handmade container is the right dimensions. I measured the width, length and depth of the folded banner card and made my box slightly larger than these dimensions.
- Cut a piece of cardstock that is the width and length of your card plus the depth of it. You make a box by scoring the base size out, and extending these lines to include the sides. Cut tabs from the corners and fold up your box. Make sure to use strong adhesives to put the box together.
- If you would rather have a template for your box, you can find a free printable one by looking at these search results. You may still need to adjust the size of your template to make it fit your handmade card, but you will get a good idea about how to put together a box from the templates.
- Also check and see if you have a die that makes boxes in your stash. Then you can make your card to fix the box instead of the other way around!
- Use cardstock that looks a bit
like Khaki. I used Stampin' Up's Sahara Sand but since that is now retired, try something like Basic Beige cardstock and ink. Or you could choose a shade of green instead? Making a camouflage finish would also be something you might like to do - add random splotches of green, brown and beige inks to the cardstock before making into a box. You could even draw random shapes with your Stampin' Write Markers and colour them in.
- Before assembling the box, score lines randomly across the lid of the box to make it look older and scratched from use
- Next take some lighter coloured ink (I used the colour Sahara Sand again but try Basic Beige instead) and grunge up the corners and edges of the outside of the box, and also the ridges made by your score marks, with an inked up sponge dauber
- Use a darker coloured ink or two (I chose Stampin' Up's Garden Green and Chocolate Chip, but Chocolate Chip is retired so try Early Espresso ink instead) and some sponge daubers to define the edges and score marks even further. I scuffed the ink pads across the flat surfaces of the box as well
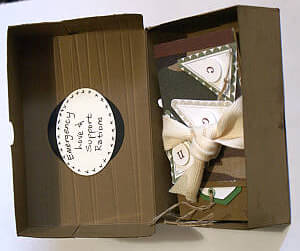
- Then I punched a half circle in the lid edge to make a thumb or finger space to make the box easier to open, and it was done, except for the message I put under the lid using my rubber stamps and some paper punches
I also made a banner card to go into this box.
If you make a custom made box to give someone special graduation wishes or for any other reason, I hope you will let me see it. I just love seeing what you make. It gives me ideas as well to see your work and that keeps paper crafting fresh and fun.
Your project could also be featured on PaperCraftCentral.com!

Do You Have A 3-d PaperCraft Project To Share?
Do you make 3-d PaperCraft items? I'd love to see your work. Please do share below.
What Other Visitors Have Said
Click below to see contributions from other visitors to this page...
"HOOAH! It's an army thing." Box Not rated yet
I made this box to send to the army for a Veteran's day project that my Interact Club was doing. We each made a customized box and put different things …
If you liked this project idea, you make like to try out a few other handmade box ideas:


New! Comments
Have your say about what you just read! Leave me a comment in the box below.