- Home
- Papercraft Adhesives
- Make a Punched Bunny!
Paper Punch Bunny
Written and Created by PaperCraftCentral Susan
See how to make a paper punch bunny in time for Easter cards, scrapbook pages and baskets!
"The great gift of Easter is hope - Christian hope which makes us have that confidence in God, in his ultimate triumph, and in his goodness and love, which nothing can shake."
Basil C. Hume
I know bunnies are often featured at Easter, and for me they signify new life especially with the non species specific egg deliveries they make! Eggs are about new life for sure.
I learned how to make this paper punch bunny at a Retreat held for our Stampin' Up! team.
It is so quick and easy to make you could have a whole rabbit warren going in just a few short hour if you wanted to.
If you only have a few minutes to craft, you can turn one of these little guys out in very short order.
I thought I would share this little project with you so you can make a cute little rabbit whenever the mood takes you.
This hand made embellishment could adorn a scrapbook page about Easter, spring, your pet rabbit, a handmade greeting card for a child, a greeting card for Easter, or even embellish an Easter basket made to hold eggs for your children or grandchildren.

How to Make a Paper Punch Bunny
Here are the supplies I chose for my own project. Modify them according to what you have in your stash or to suit your own special occasion:
- Paper punches: 1 3/4" Circle, Large Oval, 1/2" Circle
- Crop-a-dile
- Cardstock (mine is from Stampin' Up!) in Basic White, Basic Black and Rose Red (retired)
- Adhesive of choice, but make it a strong one if you are making boxes that will hold heavy chocolate eggs! I would suggest Stampin' Seal
- Stampin' Dimensionals
- Black Stampin' Write! journaling pen and white
Signo gel pen(you can get these at Spotlight or Office Works in Australia)
- Rose red split pin brad or similar. Rose Red is a retired colour so pick something pink! Rose Red was a medium to deep pink but choose baby pink if that is your preference. Something like Bubble Bath would work too, a cross between lavender and pink. If you don't have a pink brad but do have white ones, colour them with your alcohol ink blender pens in Bubble Bath or any other colour you would choose for your bunny will be alright.
Even though it is easy to make this rabbit face, it is always easier to see it made on a video, right? So I made a video for you and posted it below.
I hope it shows the instructions clearly enough for you. I did use slightly larger paper shapers or punches in the video than I used on the example basket, so do adjust the sizes to suit your own purposes.
If you need to add paper punches to your stash, you can find the current Stampin' Up! selection in my online store and order them if you live in Australia. Stampin' Up! is in many countries of the world so search for a Demonstrator near you if you live in a country other than Australia.
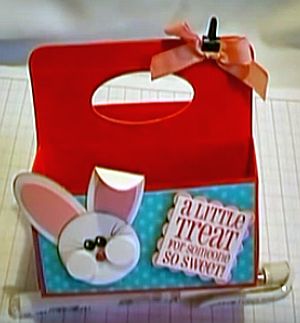
After I made my embellishment, I attached it to a double basket I made using two Box #2 Stampin' Cut and Emboss Machine dies (the dies are no longer available so choose another way to make boxes you can glue back to back) adhered back-to-back. I left the boxes open and adhered the open lids together, then made a handle with my Large Oval paper shaper.
I decorated the whole thing with scraps of designer series paper and a stamped saying from the Stampin' Up! Got Treats stamp set (now retired). It was popped up on Stampin' Dimensionals too.
Just CASE (it stands for Copy And Share Everything) the ideas with your current supplies
Do let me know if you make any paper Easter goodies yourself, especially if you decide to make a cute little rabbit like mine. Check out the Stampin' Up! catalogue for current punching, embellishing, cardstock and adhesive supplies. You can download your own digital copy of the current catalogue anytime and browse at your leisure!
Now for the video with instructions for making a paper punch bunny of your own:
If you made this bunny and would like to share it with me, do upload a photo of your project below and tell me who you made it for and why. I could feature your idea on the PaperCraftCentral website!
Do You Have A 3-d PaperCraft Project To Share?
Do you make 3-d PaperCraft items? I'd love to see your work. Please do share below.
If you enjoyed this project, you might like to try making something else, like:
- A paper gift box
- An origami project
- Some paper flowers
- A heart shaped box
- An explosion album
- A paper butterfly
Or if you are in Easter themed mode, try this idea for an Easter Card or make other Christian themed gifts.


New! Comments
Have your say about what you just read! Leave me a comment in the box below.