- Home
- Papercraft Adhesives
- Stamp Kissing
The Kissing Technique
Written and Created by PaperCraftCentral Susan
The Kissing Technique is a fun way to combine two or more images to create beautiful effects for your cards or other paper craft projects.
"Is not a kiss the very autograph of love?"
~Henry Finck
You can adapt this idea for use
on paper or stampable surfaces anywhere.
Try it on your scrapbook pages to make special embellishments and borders as well.
Note: be sure to use archival, acid free ink in your scrapbooks, especially if you are using the ink near your photos so the chemicals in the ink do not harm your photos.
Try it on 3d projects such as boxes, bags and handmade gift wrap or tags.

How to Use the Kissing Technique
Please note: All supplies used here at PaperCraftCentral are usually from Stampin' Up!
You will need:
- Some cardstock. Here I used Basic White.
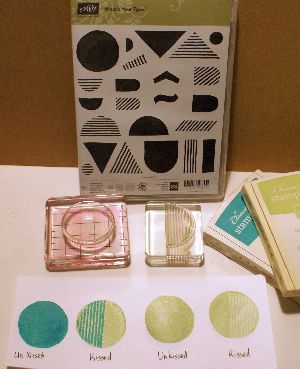
- One solid shaped stamp plus one line stamp (such as a rectangle for your solid and a flower image for your line stamp). The important thing is that a line stamp usually is like a drawing that you could choose to colour in. For example, I chose the What's Your Type stamp set (retired) to show you how
- Ink of your choice. Here I used Certainly Celery (retired) and Bermuda Bay (retired). It's fine to choose just one colour if that is what you want. If you choose two colours of ink, just choose two inks that are different enough to create a contrast, so maybe a light ink and a dark ink.
- Do not choose inks that will blend together unless that is the effect you want. Be sure to choose pigment inks to create crisper images.
- A stamp-a-ma-jig , Stamparatus or any stamp positioning tool can help here to get your images lined up on your project exactly where you want them. You can also use this tool to be sure you stamp the second image exactly over the first image.
Here's what to do:
- Choose your first cardstock colour. I chose Basic White cardstock.
- Now ink up the solid shaped stamp, such as the circle I used in my demonstration, with your lightest colour of ink. I chose Certainly Celery.
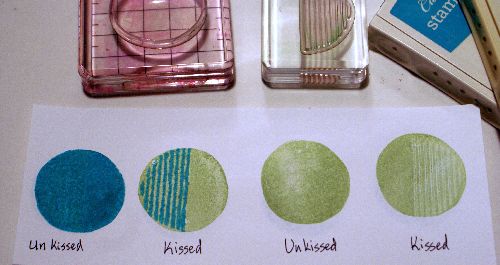
- Before making your image with the solid shape with just this one colour on it, use the uninked line stamp (the stripes here) to kiss the solid stamp thus making line images on the solid image. See the image on the far right for this effect. You can see that the whole image is inked in Certainly Celery and no Whisper White shows through. The addition of another layer of Certainly Celery as a stripe makes the stripes a shade darker than your first background image.
- NOTE: You are stamping twice on your STAMP for this technique, then stamping it on cardstock.
What's Next?
- Now you have the basic technique sorted, you can play with colour!
- You can ink the line stamp up in a different colour to create a contrasting coloured image, like the image second from the left. Again, the Certainly Celery ink shows through behind the Bermuda Bay ink.

- Now you can press your solid, kissed image on to the Basic White cardstock, using the stamp-a-ma-jig or Stamparatus if you like to line it up
- Trim, mount and use your image to finish your card
More ideas:
- Try different stamp combinations and colours to get different effects.
- Try a metallic ink with the line stamp image.
- Use more than one line image on your solid image, or more colours of ink.
- You can get a softer effect if you spritz your doubly stamped stamp with a fine mist of water before impressing it on your surface.
- Twist your line stamp as you impress it on the solid stamp for an interesting skewed effect.
- Try loading your line stamp with bleach instead of another colour of ink before impressing it on the solid stamp. You may even change the underlying colour of coloured cardstock with bleach!
- Try the technique on coloured cardstock and see how the cardstock colour changes the ink colours and vice versa.
- Use Versamark ink as your contrast ink and emboss the stamped, kissed image.
Whatever you decide to do, enjoy playing with the Kissing Technique.You may even come up with more ways to apply your knowledge of this technique. If you do discover soemthing new, share it with me and with other readers at PaperCraftCentral (see submission form below).
I hope you will also share your projects with me when you have tried this idea out, even if you don't discover a new way to apply it.
Do You Have A 3-d PaperCraft Project To Share?
Do you make 3-d PaperCraft items? I'd love to see your work. Please do share below.
If you liked this ink technique, you might like to try the emboss resist technique, or try something different and use your inks and stamps to make a decorated candle.
If you would like to learn how to use leftover strips of cardstock or designer series paper, the Iris Folding Technique might be for you.


New! Comments
Have your say about what you just read! Leave me a comment in the box below.